
| 일 | 월 | 화 | 수 | 목 | 금 | 토 |
|---|---|---|---|---|---|---|
| 1 | 2 | 3 | 4 | 5 | 6 | |
| 7 | 8 | 9 | 10 | 11 | 12 | 13 |
| 14 | 15 | 16 | 17 | 18 | 19 | 20 |
| 21 | 22 | 23 | 24 | 25 | 26 | 27 |
| 28 | 29 | 30 | 31 |
- stack
- AfxMessageBox
- 형변환
- Kotlin
- darkmode
- 보늬밤
- 제곱근
- 코인거스름돈
- MFC
- android
- QoS
- WebView
- Dialog
- 리틀포레스트
- DynamicProgramming
- devicedriver
- LRU
- Dokka
- 동적프로그래밍
- DataStructure
- Java
- SPI
- memory
- synergy
- 피요모리2
- Collection
- math
- 피보나치
- 쌓기게임
- FirebaseAuth
- Today
- Total
퉁탕퉁탕 만들어보자
Glide 로 imageView에 이미지 로드하기 (w/ version Catalogs) 본문
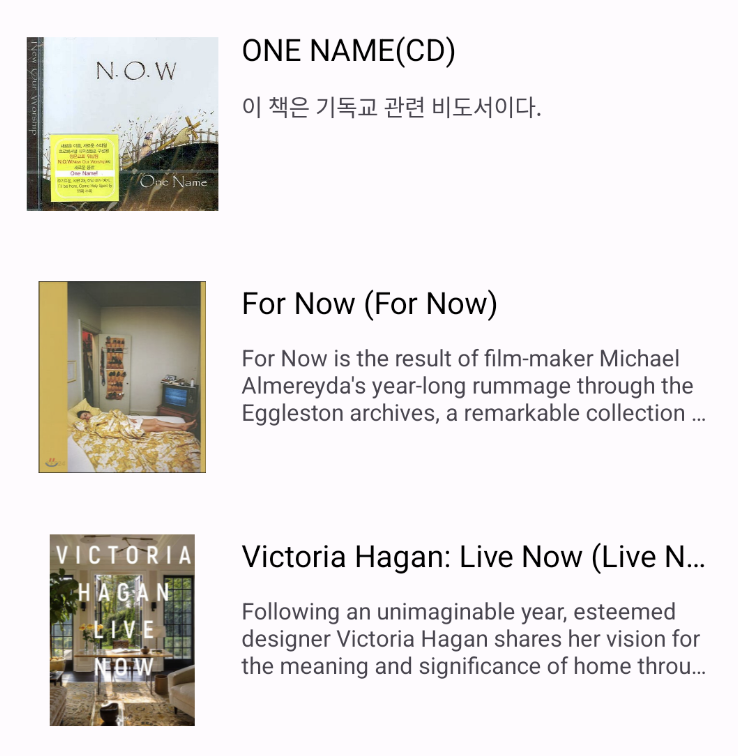
간단하게 100 x 100 사이즈의 이미지뷰 공간에 이미지를 로드하려고 한다.
Glide 로 이미지 로드하기
glide 공식 가이드에 따라, glide, glide compiler, android lifecycle compiler 3가지가 필요하고 kapt를 사용한다.
기본 설정
1. libs.versions.toml
[versions]
..
glide="4.15.1"
glideCompiler="4.15.1"
lifecycleCompiler = "1.0.0"

[libraries]
glide = { module = "com.github.bumptech.glide:glide", version.ref = "glide"}
glide-compiler = { module = "com.github.bumptech.glide:compiler", version.ref = "glideCompiler"}
android-arch-lifecycle-compiler = { group = "android.arch.lifecycle", name = "compiler", version.ref = "lifecycleCompiler"}

[plugins]
orgJetbrainsKotlinKapt = { id = "org.jetbrains.kotlin.kapt", version.ref = "kotlin" }
2. 프로젝트 단위 build.gradle
// Top-level build file where you can add configuration options common to all sub-projects/modules.
plugins {
    ...
    alias(libs.plugins.orgJetbrainsKotlinKapt) apply false
}
3. 앱 단위의 build.gradle
plugins {
    ...
    alias(libs.plugins.orgJetbrainsKotlinKapt)
}

dependencies {
    ...
    implementation(libs.glide)
    kapt(libs.glide.compiler)
    kapt(libs.android.arch.lifecycle.compiler)
}
참고: https://sjudd.github.io/glide/doc/getting-started.html
로드하기
GlideModule 클래스를 생성한다. 내부는 비어도 @GlideModule 어노테이션이 작업을 알아서 해줌..
@GlideModule
class BookGlideApp : AppGlideModule() {
}
layout xml 파일에 converImageView 라는 Id의 ImageView 를 생성한다.
    <ImageView
        android:id="@+id/coverImageView"
        android:layout_width="100dp"
        android:layout_height="100dp"
        app:layout_constraintBottom_toBottomOf="parent"
        app:layout_constraintStart_toStartOf="parent"
        app:layout_constraintTop_toTopOf="parent" />
load 하고자 하는 위치에서 아래와 같이 간단하게 로드
if (imageUrl != null) {
    Glide.with(binding.coverImageView.context)
        .load(imageUrl)
        .into(binding.coverImageView)
}
아래와 같이 로드된다.
꾸며보기
지금 이상태도 나쁘지는 않지만, radius를 먹여보자
백그라운드로 깔아줄 res/drawable/background_gray_stroke_radius_20.xml 파일을 생성
<?xml version="1.0" encoding="utf-8"?>
<shape xmlns:android="http://schemas.android.com/apk/res/android"
    android:shape="rectangle">
    <stroke
        android:width="1dp"
        android:color="@android:color/darker_gray" />
    <corners android:radius="20dp" />
</shape>
이미지뷰에 백그라운드를 적용한다.
android:background="@drawable/background_gray_stroke_radius_16"일케하고 빌드하면 앗. 백그라운드는 밑에 깔렸지만 이미지가 삐져나와 예쁘지 않다.

클리핑을 해주자.
android:clipToOutline="true"

클리핑은 잘 됬는데 이게 이미지가 아웃라인에 꽉 차지 않으니 예쁘지 않다. scaleType을 지정한다. (백그라운드 넣으면 나쁘지는 않을수도)
android:scaleType="centerCrop"

center 로 잡다보니 좌우 위아래가 좀 짤린다는 단점이 있다.
어떤 정보를 줄지에 따라 모드를 잘 선택하면 좋을 것 같다.
최종 ImageView 설정
<ImageView
    android:id="@+id/coverImageView"
    android:layout_width="100dp"
    android:layout_height="100dp"
    android:background="@drawable/background_gray_stroke_radius_16"
    android:clipToOutline="true"
    android:scaleType="fitStart"
    app:layout_constraintBottom_toBottomOf="parent"
    app:layout_constraintStart_toStartOf="parent"
    app:layout_constraintTop_toTopOf="parent" />
자세한 scale type은 아래 참고
https://developer.android.com/reference/android/widget/ImageView.ScaleType
ImageView.ScaleType | Android Developers
developer.android.com
'Computer > Android' 카테고리의 다른 글
| Firebase로 로그인 연동하기 (0) | 2024.07.12 |
|---|---|
| Leak Canary Android 33 에서 Leak 발생 (0) | 2023.04.15 |
| Dagger2 가이드 번역(2) (0) | 2022.09.05 |
| Dagger2 가이드 번역(1) (0) | 2022.09.05 |
| Android checkstyle 적용하기 (0) | 2022.09.02 |
